How to Paint Maggie and Milo in the Window
In this detailed fine art tutorial, I'll teach you how to use acrylics to paint this beautiful scene of two adorable cats sitting in a window.
This is a very special piece for me because it is a portrait of two wonderful cats, Maggie and Milo, who have been a part of our family since I was in college. They came into our lives as sibling kittens, only a few weeks old, after they had been abandoned on a farm by their mother.
Maggie has always been the highly energetic and surprisingly clever leader of the duo. As a kitten, she would climb my leg, make her way up my back, and perch herself on my shoulder like a furry little parrot. As an adult, she learned to hunt house flies on command and taught herself to drop rubber balls from the top of the basement stairs so that she could chase them as they built up speed. Yet her independent spirit has always been balanced by her loving loyalty. Mom jokes that she could never play "hide and seek" because Maggie would immediately be right outside the door giving away her position.
Milo has always been the very definition of relaxation and sweetness. A gentle soul who was perfectly at ease being picked up, draped over your shoulder, and carried like a baby. While he loved everyone in the family unconditionally, his bond with my brother was nothing short of legendary. He followed him around like a shadow. If my brother was in his bedroom playing computer games, Milo was certain to be curled up on his bed supervising.
Sadly, Milo passed away last year at the age of seventeen. Though his tiny footsteps are gone from the hallways, our memories of his sweet and loving companionship will be with us always. This past Christmas was the first that we've shared without him. And while nothing can replace watching him as he pounced on piles of wrapping paper or tried to steal tinsel from the tree, I thought that a painting would be a fitting tribute to the joy he brought all of us. So I created this piece as a Christmas gift to my family, so that Milo could be with us, at least, in spirit and memory.
Along the way, I documented each step of the project with sequential photographs and detailed notes, which I will share with you here in this complete how-to-paint tutorial. So if you're a big cat-lover like me, you may enjoy painting this scene yourself. Or if there is some other composition that has sparked your interest, the techniques presented here can be applied to any painting that you may wish to create.
Skip Ahead
Looking for something specific? Select a topic in this article to read more:
Materials and Tools
Before we get started, we'll need a few basic items: acrylic paints, brushes, a surface to paint upon, and some other miscellaneous materials and tools.
Acrylic Paints
Acrylic paints are enjoyable to work with because of their ease of use and great versatility.
When applied thin, acrylics behave much like watercolors, allowing us to apply delicate translucent glazes that enrich the layers beneath. When applied thick, acrylics behave much like oils, allowing us to blend directly on a surface and to create bold impasto textures.
But unlike watercolors, acrylics are permanent when dry and will not flow when rewetted. And unlike oils, acrylics are water-based and dry quickly. Therefore it is wise to work fast when blending on a surface, or to blend on the palette when more time is needed.
If you are new to acrylics, you may wish to experiment on a scrap surface before applying a technique to your painting.
Acrylic paints are available in tubes, jars, and bottles. They are also available in "artist" and "student" grades. I prefer tubes because they make it easy to apply the appropriate amount of paint directly to your palette. And I recommend artist-grade paints because they contain more pigment and less binder, allowing us to produce much richer effects.
Here are the colors that we'll use for this composition:
- Mars Black
- Neutral Gray
- Titanium White
- Red Oxide
- Burnt Umber
- Portrait Pink
- Cadmium Orange
- Raw Sienna
- Unbleached Titanium
- Naples Yellow
- Hooker's Green
- Light Blue Violet
- Pthalo Blue
Brushes
Paint brushes are available in a large variety of shapes and sizes. Here are the brushes that we'll use for this composition:
- 3/4in Filbert Brush
- #8 Filbert Brush
- #8 Scrumbler Brush
- #4 Round Brush
- #2 Round Brush
- #1 Liner Brush
Surface
Acrylic paints can be applied to nearly any surface that has been primed with gesso: stretched canvas, canvas board, wood paneling, etc. Projects created in a thin, watercolor-like style can also be applied to canvas paper or watercolor paper. For this composition, I used a:
- 12 x 9in Canvas Board
But you should feel free to use whichever surface at whichever size you prefer.
Palette
Palettes are available in a variety of materials: metal, glass, wood, plastic, etc. I prefer to use a:
- Rectangular Plastic Palette
However, rather than applying paint directly to the palette, I recommend first covering it with two layers of damp paper towels. Paint is then applied to the damp paper towels. This creates a "wet" palette that keeps the paint usable for a longer period of time, allowing us to work at a more relaxed pace.
Other Materials and Tools
Finally, we'll need a few other miscellaneous materials and tools:
- HB Pencil (Wood or Mechanical)
- Permanent Marker (Ultra Fine Point)
- Spray Bottle
- Water Cup
- Paper Towels
For a workspace, I prefer to use a drafting table adjusted to 45 degrees. But you should feel free to use an easel if you prefer to work vertically, or a table if you prefer to work horizontally.
Prepare a Reference
Before we begin to lay out our composition, it is useful to have a reference image. For purely imaginative pieces, some hand sketches and color studies are usually all that is needed. For more realistic pieces, photographs are a valuable resource.
For this piece, we'll reference a digital scan of a 35mm film photograph that I had taken of Maggie and Milo years ago at my parents' house:
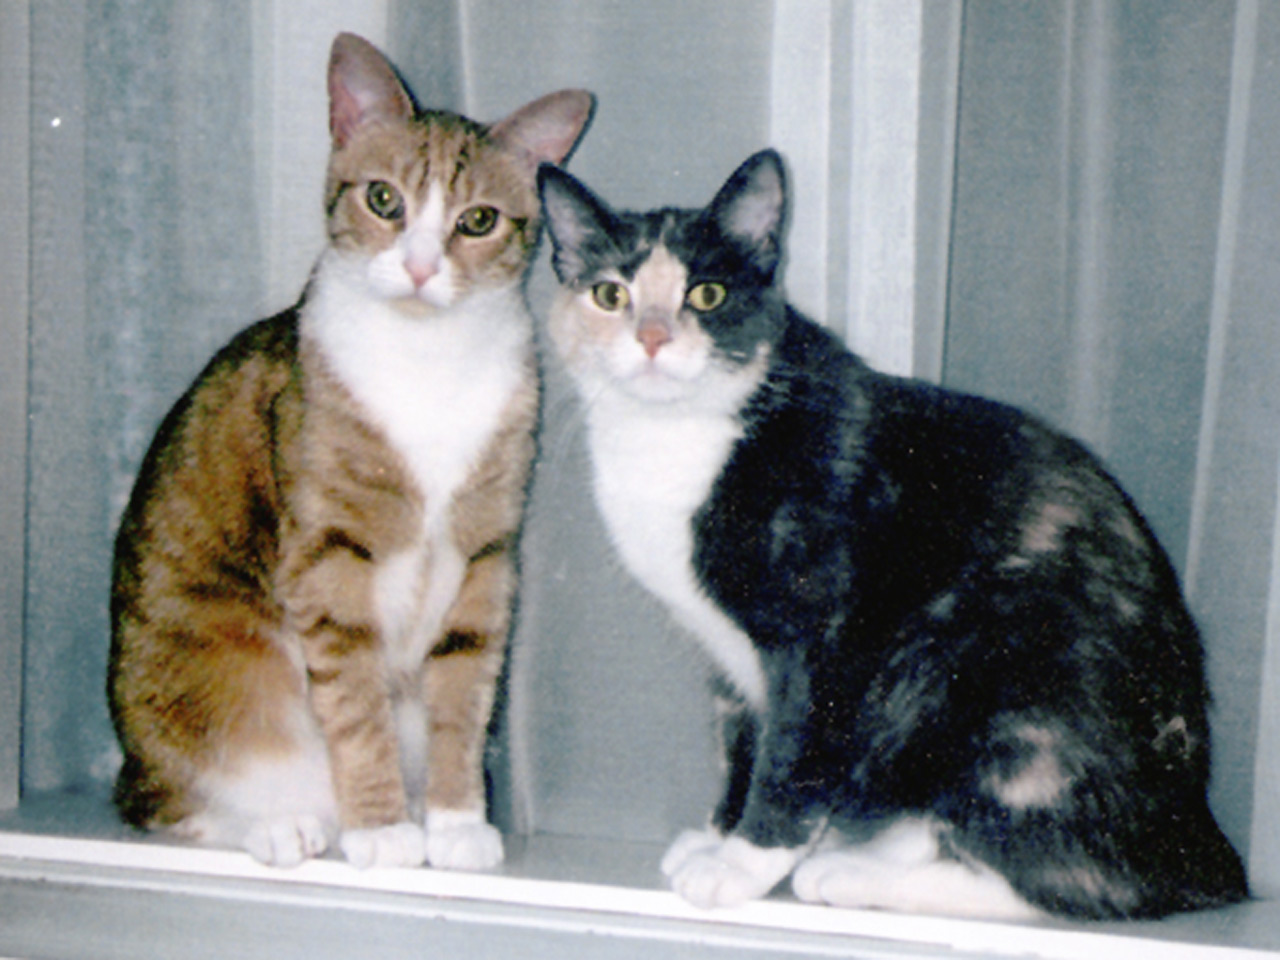
Reference
As we create our painting, we don't want to copy the reference image exactly. After all, it's a rather old photograph that appears somewhat faded and grainy. Instead we'll use our artistic license to make subtle changes to color, contrast, and overall composition to create a more vibrant and balanced painting.
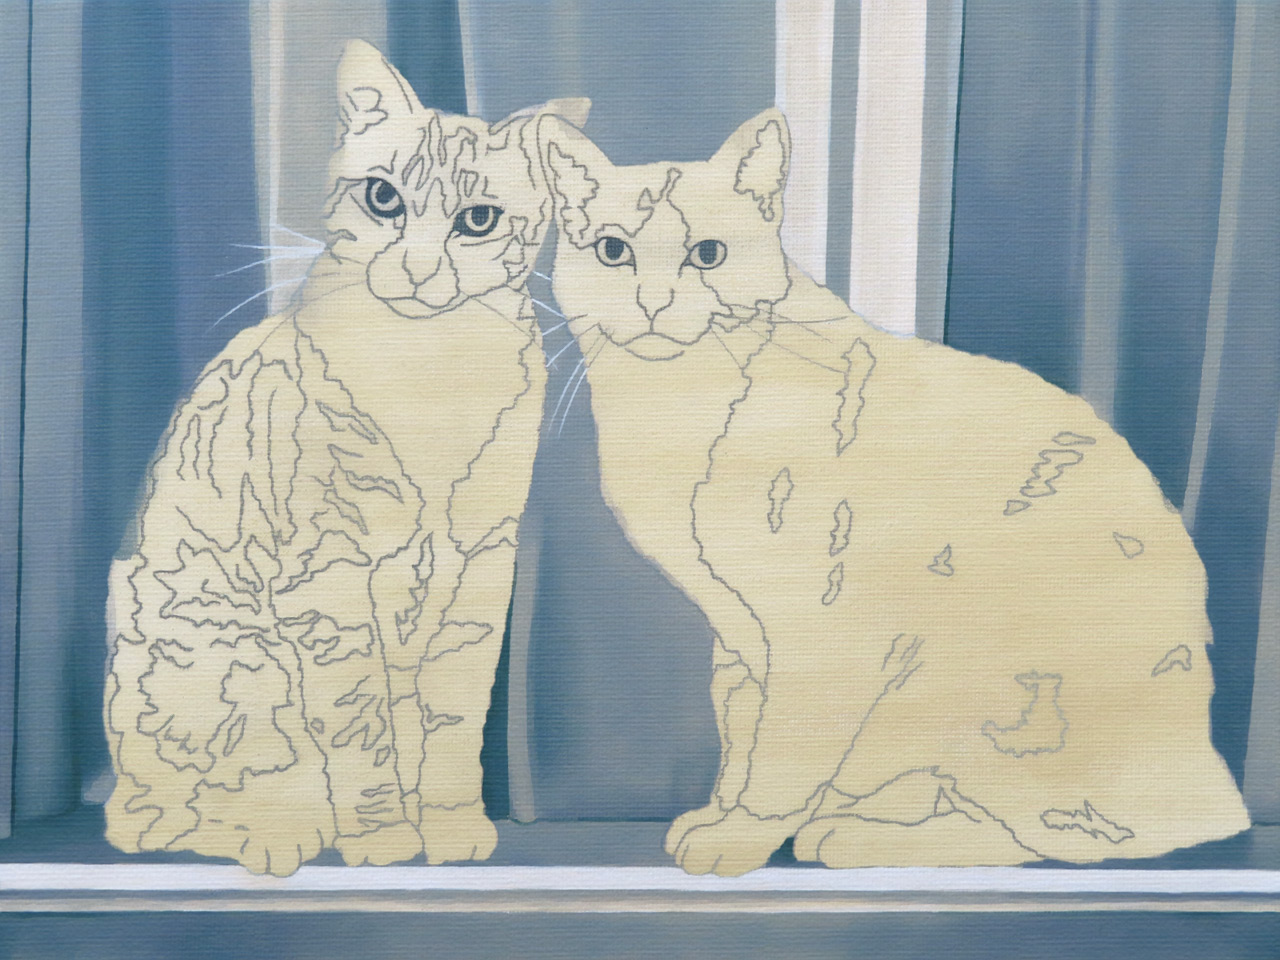
Create the Sketch
A great painting starts with a great sketch. It allows us to lay out our composition before ever touching brush to canvas. And because acrylic paints are translucent, the sketch will show through the initial layers of paint, providing a guide as we develop our painting. So taking the time to create a detailed sketch is well worth the effort.
If this feels like a challenging composition to draw freehand, you may find it helpful to lightly pencil a grid onto the canvas and a matching grid onto the reference image. This makes it easier to locate objects within the scene.
As I look at the reference photograph, I'm not entirely pleased with the angle of the shot. For this painting, I imagine a more orthogonal front-facing composition. To accomplish that, we'll make intentional tweaks to the layout of the scene as we create the sketch.
We start by blocking in the major contours with our HB pencil: the basic outlines of both cats as well as the horizontal edge of the window sill. Then, we continue to add more detail: facial features, color patterns in the fur, and folds in the window curtains.
Once the contours are complete, we trace over them with an ultra-fine-point permanent marker. This ensures that our contours have enough contrast to show through the initial layers of paint.
Here is the finished sketch:

Sketch
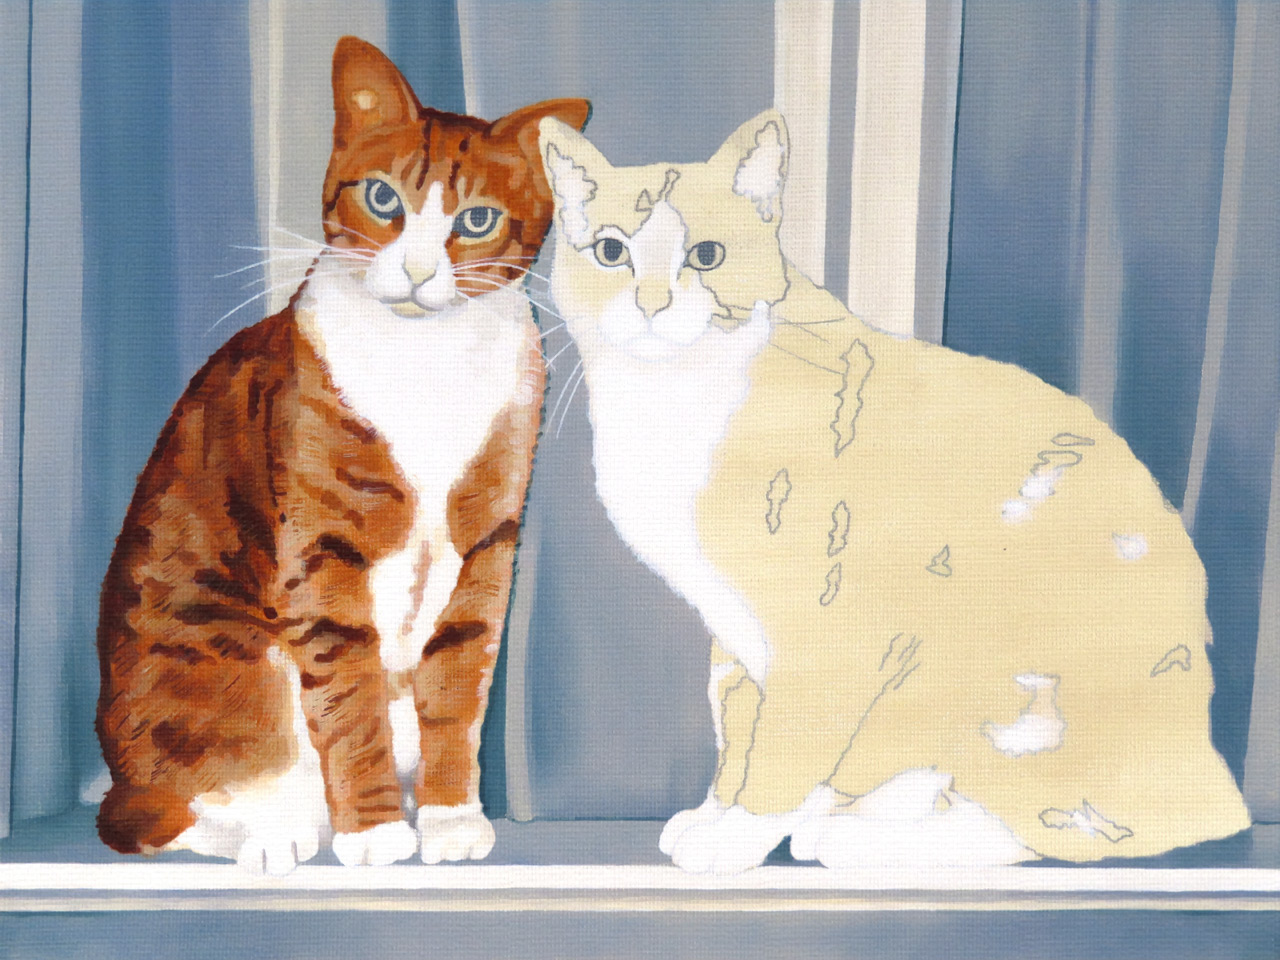
Apply the Midtone and Develop the Background
With the sketch complete, we're ready to start applying some color. At this stage, we're not concerned with detail. We only want to set the overall tone and temperature of the painting.
If you plan to display your painting without a frame, I recommend painting the edges of the canvas with Mars Black.
- Mars Black
The first layer of paint that we apply to our composition is a translucent glaze of Unbleached Titanium to create a warm midtone value.
- Unbleached Titanium
This midtone value sets the overall tone and temperature of the painting. It will also serve as a convenient reference point as we work to develop warmer/cooler and darker/lighter values later on. This layer is typically referred to as the underpainting.
To create a smooth glaze, we add only a little bit of water to the Unbleached Titanium to reduce its opacity. We then load a small amount of the mixture into a 3/4in filbert brush and apply a thin layer over the entire composition.
The contours that we shaded with permanent marker should remain clearly visible through the midtone value.
If coverage appears a little thin after the first pass, we can wait for the initial glaze to dry and add another layer by repeating the same process. The desire is to create a meaningful base of color while allowing the sketch to continue to show through.
Once the underpainting has dried, we begin to develop contrast throughout the background by roughing in the lighter and darker values.
For this step, we add two colors to our palette:
- Titanium White
- 50% Neutral Gray and 50% Light Blue Violet
Working from lighter areas to darker areas, we apply a thicker, but still somewhat translucent, layer of paint to the window curtains and window sill. Larger areas are filled with a #8 filbert brush and small areas are filled with a #4 round brush. At this point, some subtle hints of the sketch should continue to remain visible.
Here is the painting with the midtone applied and the background developed:

Midtone Applied and Background Developed
Render the Background
With the underpainting finished, we are ready to start completing individual areas of the composition. We will begin with the background of the painting and then work our way forward.
For this step, we add one gradient to our palette:
- 33% Neutral Gray, 33% Burnt Umber, and 33% Pthalo Blue
- 50% Neutral Gray and 50% Light Blue Violet
- Unbleached Titanium
- Titanium White
Here we apply some midtone values from the gradient to the larger areas of curtains using a #8 filbert brush. While the paint is still wet on the canvas, we apply some darker values to add shadows and lighter values to add highlights, blending them as we progress. As we render each area, we want to pay attention to the form created by the folds and creases in the curtains. This form will guide us as we determine which areas will receive shadows and which areas will receive highlights. Similarly, we want to pay attention to the shadows cast by both cats.
With the larger areas of the curtains complete, we shift our attention to the smaller areas and finer details. Using the same gradient, we apply various values using a #4 round brush to indicate tighter creases in the fabric.
The window sill is rendered in a similar fashion. Again, we work the large areas first, blending values while the paint is still wet on the canvas. Then, we complete the smaller areas and finer details.
Once the background has dried, we add whiskers by drawing out some Titanium White, lightly thinned with water, using a #1 liner brush. By varying pressure on the brush, we form each whisker so that it is thicker at the base and thinner at the tip.
Here is the painting with the background rendered:
Background Rendered
Develop the Highlights
With the background finished, we are ready to begin developing the two adorable subjects of our painting: Maggie and Milo. As we render each cat, we want to pay close attention to texture. Creating the impression of soft fur will strongly guide our decisions in brush selection and brush strokes.
Let's start with the white areas on each cat.
For this step, we add one color to our palette:
- Titanium White
With a #8 scrumbler brush, we apply Titanium White using a combination of dabs and short strokes. We apply paint rather thickly, allow the bristles of the brush to gently spread out on the canvas. We can increase the variety and complexity of texture by rotating the brush and changing the angle as we work through the composition. This technique creates soft edges that include thin, sharp features which give the distinct impression of fur.
Here is the painting with the highlights developed:

Highlights Developed
Render Milo
With the highlights developed, we're ready to begin rendering the main colors and patterns in each cat.
Let's start with Milo, the orange cat on the left.
For this step, we add one color to our palette:
- Cadmium Orange
And one gradient:
- Burnt Umber
- Raw Sienna
- Unbleached Titanium
- Titanium White
Here we continue with the #8 scrumbler brush, relying upon the same technique of applying dabs and short strokes that we utilized in the previous step. We begin with Milo's body, first applying Unbleached Titanium to loosely render the lighter colors and highlights throughout his fur. Next, we move to Raw Sienna to create the midtones, and finally to Burnt Umber to create the darker values. As we give form to the body, we may notice that the fur color appears a bit muted.
To add a touch of vibrance, we mix a little Cadmium Orange into our brush. Cadmium Orange is a very strong hue, so we want to take care that we don't overdo it.
Once the values of the body fur have been roughed in, we add greater detail by brushing in some intermediate values from the gradient on our palette. Here we pay close attention to the shapes and patterns that we create. We also want to be very conscious of how our brush strokes and the spreading of the bristles produce the impression of fur.
With his body finished, we are ready to begin rendering Milo's face. Here we switch to a #4 round brush, applying values from the same gradient. At this stage, we are focused only on the fur. We'll render his eyes, ears, and nose in a later step using a different color palette.
Here is the painting with Milo rendered:
Milo Rendered
Render Maggie
With Milo's fur now beautifully rendered, we'll switch our attention to his sister, Maggie.
For this step, we add one gradient to our palette:
- Mars Black
- Neutral Gray
- Unbleached Titanium
- Titanium White
Maggie's coat is mostly a mottled gray with light tan patches. As with Milo, we apply paint in dabs and short strokes with a #8 scrumbler brush to render her fur. Here we start with Neutral Gray as the midtone value, leaving the light tan patches bare so that the Unbleached Titanium underpainting continues to show through.
Once Maggie's body has been blocked in with the gray midtone, we begin applying darker and lighter values from the gradient on our palette. First, we place a somewhat random application of values throughout her body to replicate the subtle mottling in her pattern. Then, we give form to the still rather flat midtones by strategically applying shadows along her back and highlights along her forearms and hips. Finally, we render the tan patches with Unbleached Titanium, occasionally blended with a little Neutral Gray.
As with Milo, we render Maggie's face with a #4 round brush. Once again, we are only focused on the fur. We'll complete the finer facial details of both cats in the next step.
Here is the painting with Maggie rendered:

Maggie Rendered
Add Detail to the Faces
In the final step, we complete the faces of both cats by rendering their eyes, ears, and nose.
For this step, we add four colors to our palette:
- Mars Black
- Titanium White
- 50% Raw Sienna and 50% Naples Yellow
- 50% Naples Yellow and 50% Hooker's Green
And one gradient:
- Red Oxide
- Portrait Pink
First, we render the eyes with a #2 round brush. Milo's irises are equal parts Raw Sienna and Naples Yellow. Maggie's irises are equal parts Naples Yellow and Hooker's Green. We create the pupils for both cats using pure Mars Black, along with the thin, dark outline that frames each eye. Once that layer has dried, we complete each eye with a small dot of Titanium White to indicate a pinpoint of reflected light.
Next, we apply values from the Red-Oxide-to-Portrait-Pink gradient to render the ears and nose.
Only one finishing touch remains: whiskers. Here we pick up some lightly thinned Titanium white with our #1 liner brush. And after a few gently curved strokes radiating from the cheeks and above the eyebrows, our furry faces are complete.
Here is a close-up of the painting with the faces rendered:
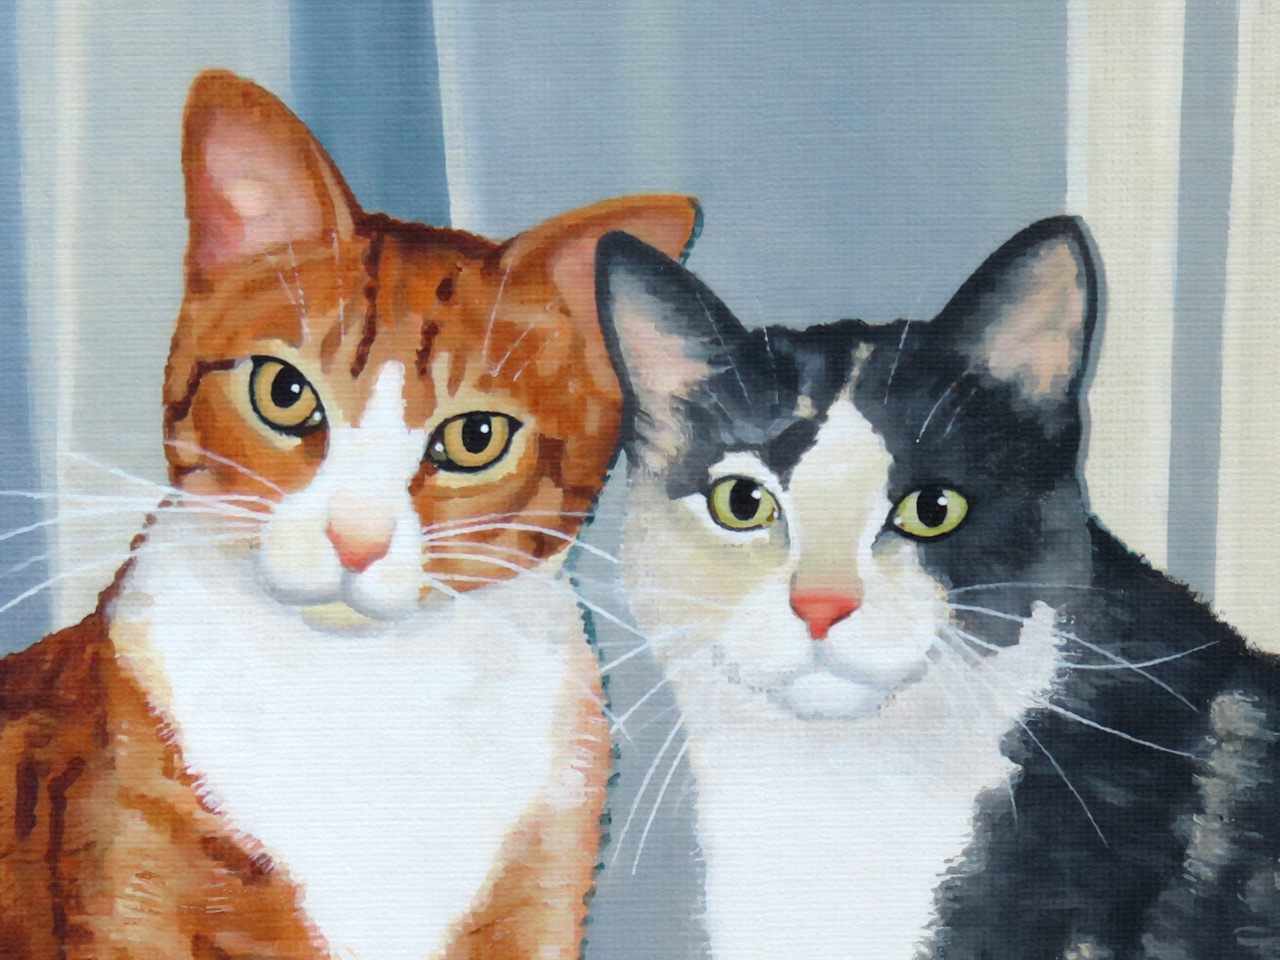
Faces Rendered
And with that...
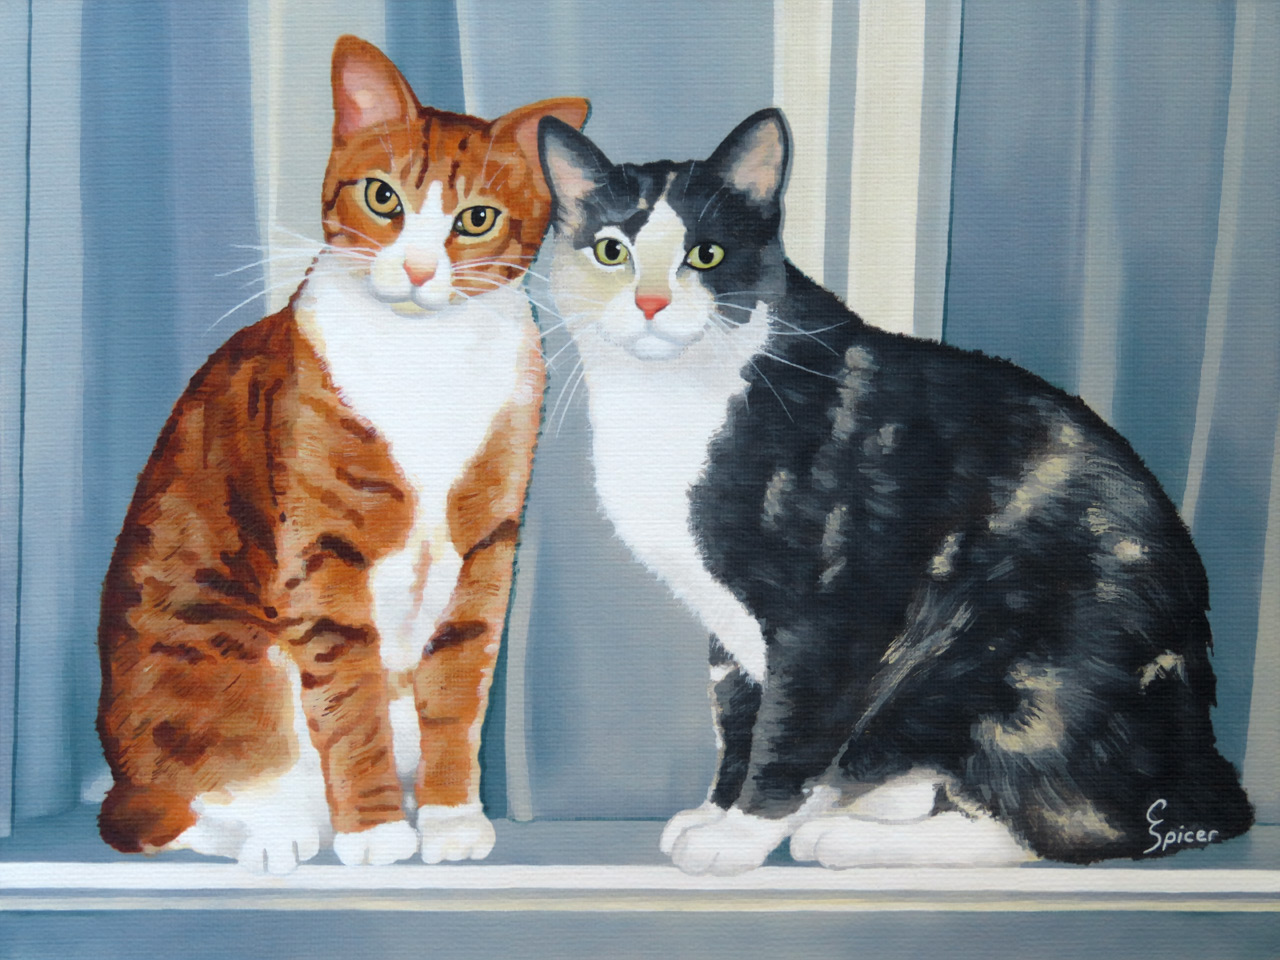
Congratulations! Your painting is now finished and ready to sign:

Finished Painting
And there you have it! A beautiful pet portrait of two adorable kitties that you can hang in your home.